How to Photograph Lightning by Stephen Cheatley
Since we first began the Weather Photographer of the Year competition in 2016, we have received many amazing images of lightning in action. We asked Stephen Cheatley, winner of the 2018 competition with his lightning image ‘Electric Blackpool’, to explain the art of taking such stunning photographs of lightning.
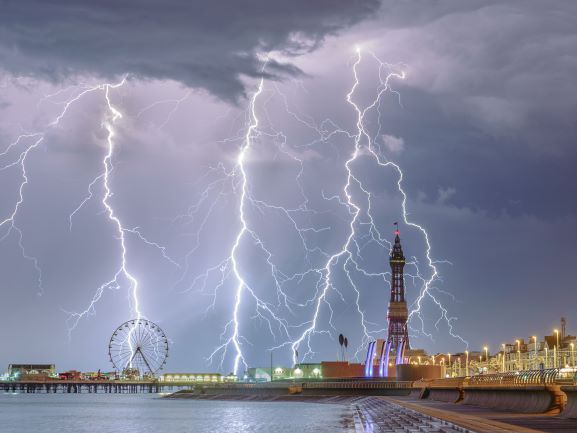
I am often asked, when people see my award-winning image of colossal lightning strikes crashing down above Blackpool, how I captured it. The answer is not that I was simply lucky, although luck played some part, but that a number of things came together to make the shot possible. It was actually the first time I had ever photographed lightning!
Safety first
If you want to attempt to photograph a thunderstorm, one of the most important things to consider is your personal safety. Lightning is one of the most dangerous natural phenomena to photograph. Thunderstorms can be unpredictable and pop up anywhere, when conditions allow. They can also move very fast. You may have heard it said about tornados that if one appears not to be moving, it may well be coming straight towards you! In the case of a thunderstorm, it’s possible to count the time between the lightning strike and the resulting thunderclap to get an idea of how far away it is. Counting further strikes should indicate if the storm is moving away, or towards you. Count in seconds how long between the strike and the sound of thunder & then divide by five. For instance, a count of ten seconds means the lightning strike was around two miles away.
Monitoring the storm’s location in relation to yours can help to keep you safe but the safest way to photograph lightning is undoubtedly from indoors. You can set your camera up against the window and snap away in safety. You may, however, find the window view a little too limiting. In this instance, you could place your camera outside and use a wireless remote to trigger the shutter. If, on the other hand, you are feeling a little more adventurous and wanted to go out and ‘chase the storm’ as it were, another tip is to shoot from inside a vehicle.
Always keep in mind the frequency of lightning strikes, along with the time between the strike and the sound of thunder. You really want to be on the edge of a storm, rather than in the middle. Not only is it safer to photograph a storm from the edge, but it’s also easier. You are also less likely to get wet!
Equipment needed for lightning photography
- A DSLR or other type of camera capable of shooting long exposures
- A tripod
- Remote shutter release or intervalometer
- A weather radar app for your smartphone which can show where lightning strikes are occurring
- Rain protection for you and your camera
Waiting for the perfect shot
Once you have your equipment ready and there is a lightning storm on its way then you need to set up in order to give yourself the best chance of capturing a strike. If you happen to be photographing during the day, it would probably be better to video the storm because capturing lightning strikes requires a slow shutter speed, which may not be possible during daylight. If you are lucky enough, the storm may occur during the late evening, or, in my case, at night. Photographing lightning at these times of the day is much easier because you can use slower exposures, which will increase your chances of capturing a strike.
Camera settings for photographing day-time lightning
- Set up the camera on a tripod
- Focus camera lens on infinity
- Set the aperture of the lens to f16 or smaller. This will close the iris inside the lens, allowing a longer shutter speed to be used
- Set ISO to the lowest it will go, ie ISO 100
- Take a test exposure using the slowest shutter speed allowed to see if the image is exposed correctly
- Use a remote timer/intervalometer to fire the shutter continuously.
Camera settings for photographing night-time lightning
- Set up the camera on a tripod
- Focus camera lens on infinity
- Set the aperture of the lens to a medium value, such as f5.6 or f8. This will allow a longer shutter speed, and improve image quality at the same time
- Use a low ISO setting. 100-400 should be fine
- Set the shutter speed to between 5 and 20 seconds, if possible
- Take a test shot to see if the scene is exposed correctly, remembering that if a strike does happen in the field of view it could light up the scene considerably, depending on how big the strike is
- Anticipation. Keep an eye on the storm and try to predict where the next strike will be. You could compose your ideal shot, then wait for a strike to happen.
A wide angle is not always best
As for lenses, the wider lens you are using the greater the chance you will capture a strike. However, a wide lens will not be ideal if the storm you are photographing is miles away. As I mentioned, it is better to photograph a lightning storm from the edge, so using a mid-telephoto lens would be a better option, in this case, ideally, anything from 14mm to 200mm focal lengths can be used to photograph lightning strikes. The longer the focal length, the more compressed the image will look, and make the lightning appear closer than it really is. Using a mid-telephoto lens decreases your chances of capturing strikes, but like with my winning image, I composed it in advance using a 70mm focal length, anticipating that the storm was moving into the field of view. Then I just needed that bit of luck!

Stephen Cheatley - Weather Photographer of the Year 2018